Autojil Instructions#
The autojil template is a Microsoft Excel formatted spreadsheet of Autosys job definitions. These instructions pertain mostly for filling out the blank template when requesting new Autosys jobs, but can also be referenced when reviewing and modifying existing jobs. If you are going to be requesting changes to an existing job definition(s) instead of requesting new jobs, you can contact the JST team and ask that we generate a template for you pre-populated with the list of jobs you provide as they exist currently in AutoSys or you can follow the below link for self-service.
-
Blank Template Download Link: autosys_blank_template_v1_07_01.xlsx
-
Instructions for obtaining current job definitions in template can be found here
Note
The Job Scheduling & Transfer team (JST) will be updating the template over time. Please reference this page for the most recent version.
The spreadsheet allows you to enter data necessary for defining a new AutoSys job. Each row in the spreadsheet will become an AutoSys job and each column is a different AutoSys job field. After entering your data, please attach it in an email to jst-help@umn.edu. This will generate a ticket for JST to complete the additions or changes. The JST team has a tool that consumes the data entered into the template spreadsheet and imports rows as job definitions into AutoSys.
These instructions combined with information in the template itself will help you fill out the spreadsheet. However, if you ever have any questions about what values should be used when filling out any cell, please don’t hesitate to ask the JST team for assistance.
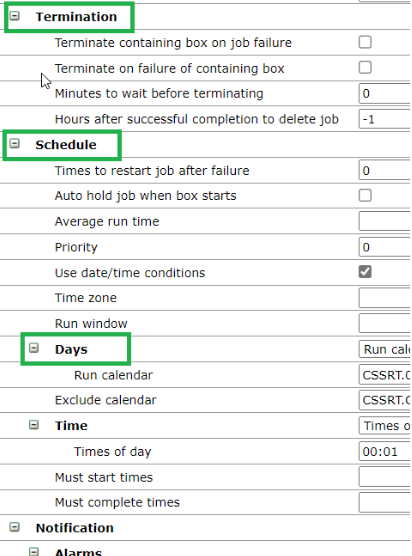
The template’s first 3 rows are grayed-out and should not be changed or removed. The first row breaks the columns into sections that match an AutoSys job definition.
The screenshot below shows the corresponding template sections in an AutoSys job definition.
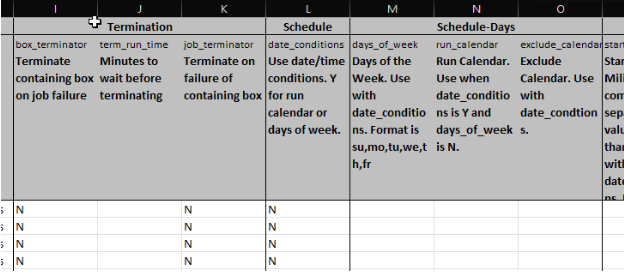
The second row gives the unique AutoSys field name for which the template column corresponds.
The third row gives you the AutoSys plain text field description and often useful hints as written by the JST team.
The fourth row is where you begin defining new AutoSys jobs (or altering existing ones if you had JST generate a pre-populated template with existing jobs). Many of the columns are defined with drop-downs that give you a list of valid values.
In general, you should fill out the template with a test instance (often referred to as TST) in mind. For most cases, AutoSys TST is where JST will create/alter the jobs you specify in the template so that you can review in AutoSys, test, and then request that we move the affected jobs forward to QAT, and finally to PRD. This means your job names, box names, file paths, starting conditions, command paths, and calendar names should reference TST. For a job name, that would mean something like CSFAT.xxxxxx instead of CSFAP.xxxxxx. However, our team can convert the data to target another environment if required.
The template was created expecting you to work from left to right. The sections (marked by text labels shown in row one) start out applying to all Job Types. As you move right, they start to become specific to a particular job type. Every section after the “Non Box Jobs” section is specific only to a particular job type. For example, if your job type is set to PS (PeopleSoft), then you’d leave blank all fields in the Comand Jobs, File Trigger Jobs, and HTTP Jobs sections.
When you choose a value from the dropdown menu for the Job Type field, it will change columns to red or green. Red means the columns should be left blank for that row. Green means those fields especially apply to that job type - although blank is often still an appropriate value.
What follows are section-by-section tips and useful information that may be helpful beyond the information included in the template itself (row three):
Primary#
All fields except Box Name are required to be filled out.
The Box Name field can be blank if the job is itself defining a box. Or, in rare cases when a non-box type job is left outside of any box.
-
Job Name: The job naming standards are explained in this spreadsheet.
-
Starting Conditions: These are the rules for when the job should execute and must follow rules defined by the AutoSys vendor. You can read more about these on the product’s website.
-
Job Type: This field has the following options at present:
-
BOX - Box Job: Boxes are AutoSys job definitions that are set up to contain a set of internal jobs. Generally, we schedule the box and any job inside the box runs according to the schedule set up for the box. You can place a job inside a box by putting the desired box name into the job’s Box Name column. You can embed multiple boxes within a parent box. Meaning, boxes can be inside other boxes.
-
CMD - Command Job: Command jobs run commands against the specified machine. For this job type, you should fill out pertinent fields in the Command Jobs section.
-
PS - PeopleSoft Job: For this job type, you should fill out pertinent fields for your job in the PeopleSoft Jobs section, and more rarely, also the PeopleSoft Jobs - Distribution section.
-
FT - File Trigger Job: For this job type, you should fill out pertinent fields in the File Trigger Jobs section.
-
HTTP - HTTP Job: For this job type, you should fill out pertinent fields in the HTTP Jobs section.
-
-
Group/Application fields: Generally speaking, each business unit that uses AutoSys has a pair of values for these two fields that are used on almost all of their jobs. If you want to know what values your group uses, you can review existing job definitions - or contact JST for assistance.
Termination#
These fields are not used a majority of the time. Most often, they are used in concert with “success” type starting conditions so that a box doesn’t get stuck in an endless “running” state.
For example, let’s say you have a situation like this:
SCHDT.ExampleBox.BX contains 2 jobs:
- SCHDT.Job1.CJ
- SCHDT.Job2.CJ
SCHDT.Job2.CJ is set up with a starting condition like this: s(SCHDT.Job1.CJ). This means that Job2 will only execute when Job1 runs to success. This is a “success dependency.” If Job1 ends with a failed state, then Job2 will not execute.Unless we set up Termination settings properly, then the Box job (SCHDT.ExampleBox.BX) will stay stuck in a status of “Running.” It can stay like that forever. This is dangerous because if the box is defined to run every day, if it’s stuck “running” then it won’t execute the following day, because it’s still running from the prior day.
To resolve this problem, we set up SCHDT.Job1.CJ to set the “Terminate containing box on job failure” field to a Y for yes.
Schedule#
There is only one field in this section. Setting this field to a value of Y tells AutoSys to try and schedule the job using values you specify in the Schedule-Days and Schedule-Time sections. In general, this field should only be set to Y for a box type job.
Schedule-Days#
Only fill out data here if the “Use date/time conditions” field is set to a Y. You can choose to schedule the job by days of the week or using an AutoSys run calendar.
Schedule-Time#
Only fill out data here if the “Use date/time conditions” field is set to a Y. You can choose to have the job scheduled using Start Times or Minutes after each hour.
Notification-Notification Services#
Below are two of the more common use cases. There are other valid configurations - please contact JST for assistance if required.
Case 1 (most common, by far) - You want a TDX ticket when the job fails#
In this case, the most common setup for this section is:
-
Notification: F
-
Default Email Address: remove@umn.edu. This will get converted to prodfail@umn.edu when migrating these jobs into AutoSys Production. remove@umn.edu is a “dead” email address as we don’t want TDX ticket alerting from non-production instances. prodfail@umn.edu will convert the email AutoSys generates upon job failure to a TDX ticket.
-
Email Message: pick your team’s value from the dropdown. This text is what the TDX email monitor uses to route the TDX ticket to the correct team.
-
All other fields in this section (Notification-Notification Services) left blank
Case 2 (much less common) - You want a TDX ticket when the job terminates or fails#
In this case, the most common setup for this section is:
-
Notification: Y
-
Default Email Address: remove@umn.edu. This will get converted to prodfail@umn.edu when moving these jobs into AutoSys Production. remove@umn.edu is a “dead” email address and this is intentional - we don’t do TDX ticket alerting from non-production instances. prodfail@umn.edu will convert the email AutoSys generates upon job failure to a TDX ticket.
-
Email Message: pick your team’s value from the dropdown. This text is what the TDX email monitor uses to route the TDX ticket to the correct team.
- All other fields in this section (Notification-Notification Services) left blank
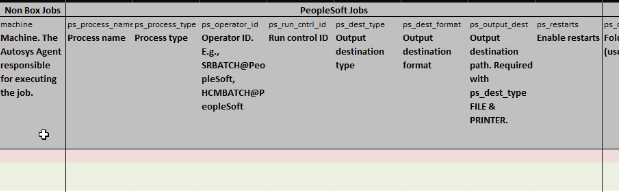
Non Box Jobs#
The only field in this section is Machine. The machine specifies where the AutoSys job definition actually executes. Below is advice on what value to use for the Machine field. This advice assumes you are starting in AutoSys TST.
If the job type is BOX - leave blank.
All Axway, PeopleSoft, Command, File Trigger and HTTP jobs should be on the machine matching your business unit's PeopleSoft pillar unless otherwise noted by JST:
-
CSTST
-
HRTST
-
FSTST
-
IHTST
PeopleSoft Jobs#
At a minimum, the Process Name, Process Type, Operator ID, Run Control ID, Output Destination Type, and Output Destination format fields are required to be filled out.
This section allows you to tell AutoSys exactly what PeopleSoft process to run and under what OperID/Run Control ID to execute the job.
It can be helpful to think of this section & the next as entering data for AutoSys to mimic what you would do if you were running the process manually by navigating to the processes run control page and clicking Run.
PeopleSoft Jobs - Distribution#
This section should most often be left blank. It should only be used when you want to tell PeopleSoft process scheduler to direct the output to Report Manager or to an email - and the process name you specify must be written in a way that it will actually reference these fields and act accordingly.
Command Jobs#
The Command column must be filled out for a CMD Job Type row. The Standard Output File and Standard Error File columns have one value each in their drop-down menus. Use those values if you want any output and/or error output the command may issue written to a file. If the command does issue information to either of those files, you can view the data from the Quick View tab.
Select the job run radio button from the Job Runs section of Quick View. Then, choose either Standard Output or Error Output from the Action menu and click the Go button.
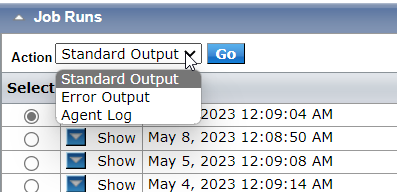
Once Go is clicked, if there was any data written by the process, it will show up below the Job Runs table.
File Trigger Jobs#
The two required fields for this job type are “File(s) to watch” and “Trigger Type.”
The most common type of File Trigger AutoSys job is set up just to verify that a particular file exists. To set a job up like this, fill out the “File(s) to watch” field with the path & file name to verify and set the “Trigger Type” to EXISTS - leaving all other File Trigger fields blank.
You can learn more about the File Trigger job type here.
HTTP Jobs#
For an HTTP Post job, invocation_type (POST), provider_url, media_type, blob_input (must be wrapped in auto_blobt tags), compatibility (12), and j2ee_conn_user will need to be filled out. The password for the j2ee_conn_user will also need to be supplied to JST for storage within Autosys.
For GET/DELETE/PUT jobs, please consult with JST.