Change Request - How-To#
This document is a how-to guide for creating an ACCE Change Request (CR) to migrate AutoSys job definitions from TST to QAT and then to PRD. Please see the overview guide for a higher level explanation of the tool, it's purpose, and the cross functional diagram.
Create the CR#
A requester has access to create a new request.
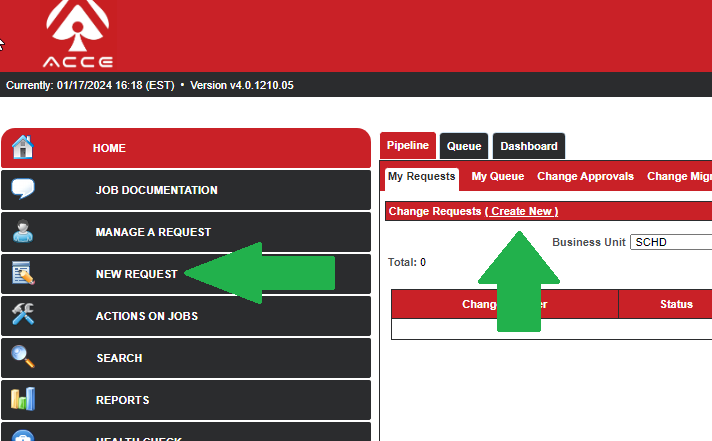
Upon clicking a button/link to create a new request, a pop-up will appear where you must select the Business Unit and Change Life Cycle. The Business Unit field will only allow you to select a unit for which you have been granted requester access.
After you select a Business Unit, the Change Life Cycle dropdown will auto-populate with the TST-QAT-PRD lifecycle. The CLC is an ACCE configuration item that describes where the CR will travel through as it migrates.
At this time, JST is only supporting the "Normal" change request Type.
Lastly, click Create.

Add Jobs to newly created CR#
Below is a screenshot showing the page ACCE displays upon creating a new CR. The green numbers indicate points of interest that will be described in further detail below the screenshot.
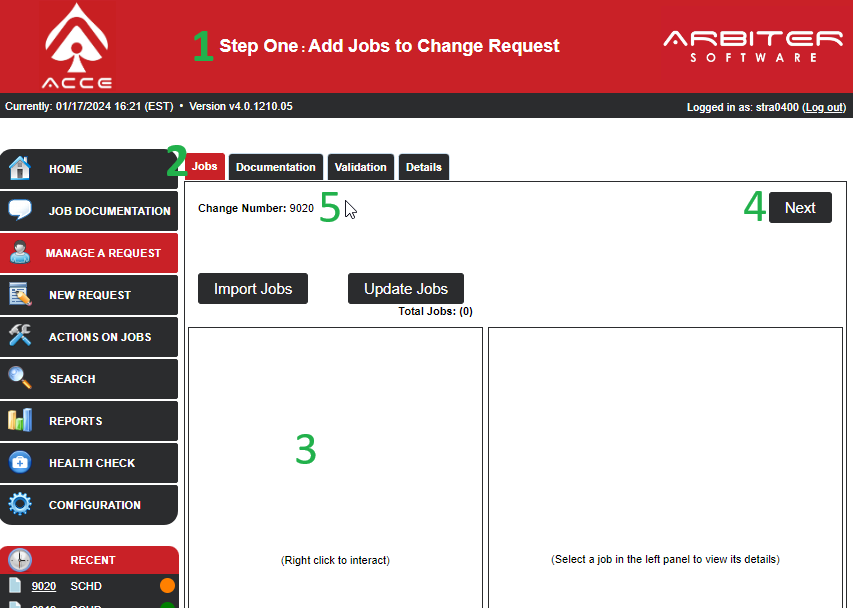
- ACCE tries to provide a helpful header indicating the step-by-step path of finishing the creation of a new CR.
- The tabs at the top of the CR are the "steps" of creating a new CR.
-
The main goal of this first step of CR creation is to add AutoSys jobs to the CR. Here is where you make sure any jobs you want migrated as part of this request are added. ACCE allows for a few ways to add jobs to a CR:
- Right click somewhere inside the box with the label "(Right click to interact)" and choose the "Add Jobs" option. Afterwards, a dialog box will appear that allows you to search for jobs. Remember that ACCE starts migration from TST - you should choose TST versions of the jobs. The search box will only allow you to find jobs that belong to business units for which you have access. You can use an asterisk as a wildcard. For example: FS*.BX would return a list of all AutoSys jobs that start with FS and end with .BX. From the results returned in the search box, you can highlight the jobs you want to migrate and click the Add button to add them to the CR. If you add a box job to the CR, it will automatically add all jobs that are members of that box.
- Click the Import Jobs button. This will open up a dialog box for you to point ACCE to a file on your local computer. It will handle a line-by-line list of jobs in a text file, or a CSV file.
-
Clicking the next button is way to advance through the steps of creating a CR. You can also just click the next tab (in this screenshot, the next tab would be the Documentation tab).
- This shows the unique number assigned to the CR by ACCE. You can provide this number to JST or reviewers so they can quickly open your CR.
You can remove jobs added in error by right clicking the job and choosing "Remove Jobs."
After adding jobs to the CR, you can highlight a job by single-clicking. The details for the selected job will appear on the right side of the screen.
When finished adding jobs to the CR, you can click Next.
The Documentation tab#
At this time, JST does not have any plans to use the functionality on this tab. You can skip to the next tab/step by clicking Next or clicking the Validation tab.
The Validation tab#
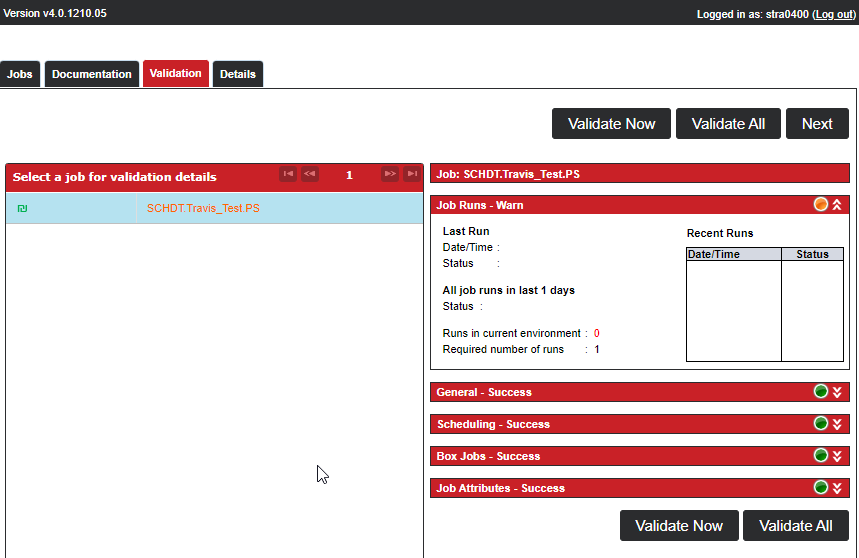
The validation step is where ACCE rules set up by JST are checked against the jobs to be migrated. You must click the Validate All button to perform validation. Results of the process will be shown by ACCE altering the text color of each job. Warnings will show up as orange, errors as red. You can proceed through warnings, but not errors. You can select a job by single-clicking in order to open up more validation result details to the right of the job.
If validation rules need to be altered or tweaked, please create a TDX ticket with the JST team using the jst-help@umn.edu email address.
Validations currently include things like:
- Enforce a basic naming convention (jobs start with 4 characters, followed by a T, Q, or P, followed by a period).
- Enforce some field-level edits, for example: run & exclude calendar names on a job definition must also follow the same basic naming convention as above.
- Do not allow the phrases TST, QAT, or PRD to appear in a job description.
- Do not allow the phrase testfail to appear in notification email address fields (this was deprecated in 2022).
- A warning (orange) will be issued if ACCE detects no runs of the job in AutoSys TST. It will not prevent moving forward, however.
The screenshot below shows an example of the CR after validation was performed. The screenshot has selected the bottom job and validation details on the right. The validation results have several sections that can be expanded.
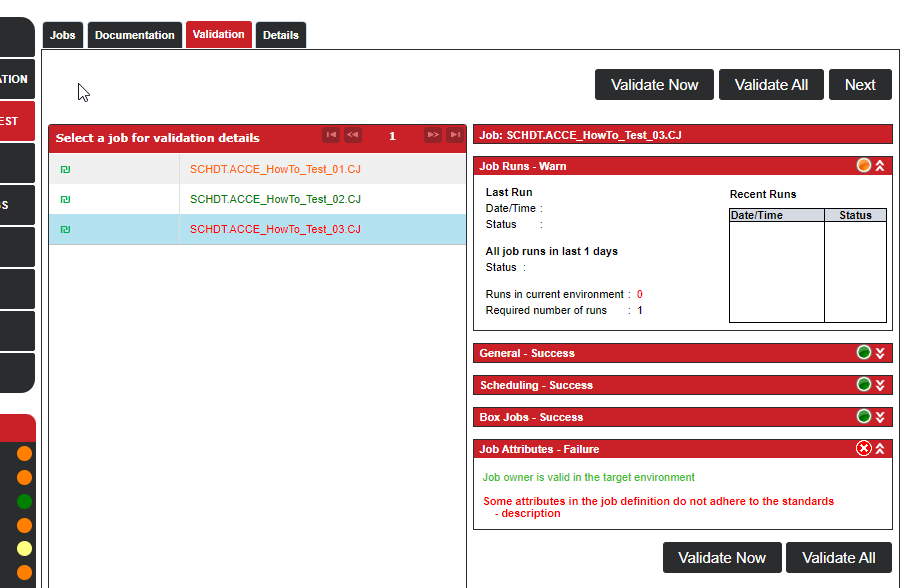
You will not be allowed to Submit the CR until all jobs have been successfully validated without errors (warnings will not prevent proceeding). Below is a screenshot showing what an error looks like.
After validation is complete and errors are resolved, click Next to move on to the final step of initial CR creation.
The Details tab#
On this tab, please put the TDX number associated with this migration request into the "Service Desk Ticket Number" field. Please put the TDX number only, not words like TDX or leading/trailing spaces.
You must also enter a description in the large description text box. This can be whatever you would like. JST currently has no plans to use this field - so please communicate any special needs in the TDX ticket instead of in this field.
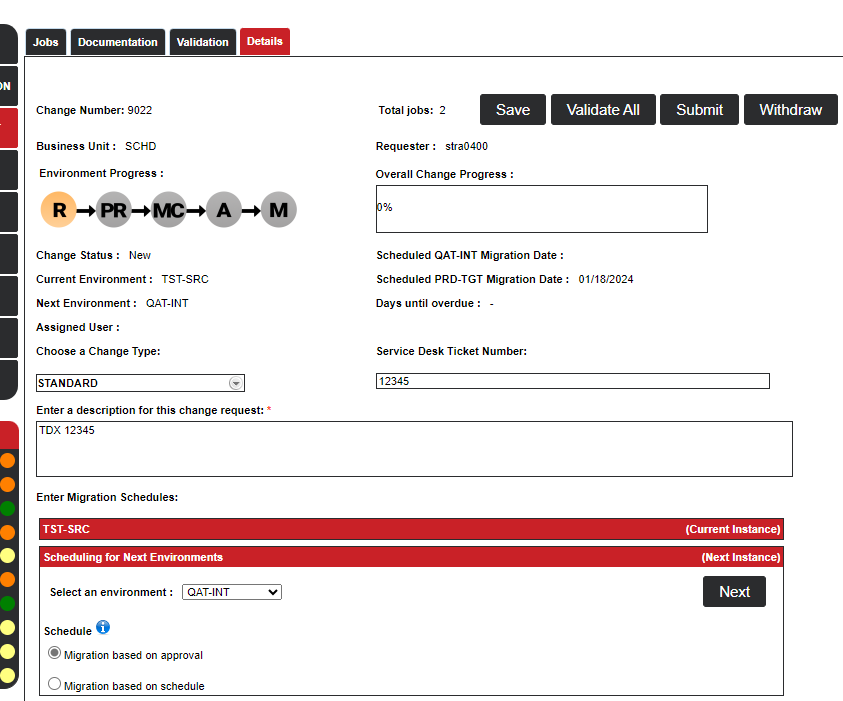
In general, you'll ignore the fields under the "Enter Migration Schedules" section and leave things as-is by default. The default migration method is "Migration based on approval." This option just means that it will migrate whenever the migrator pushes the button (described a bit more later in the document). However, if you want to set a specific time for the CR to migrate to QAT and/or PRD, please see the following article article.
You can always Save your progress. But, clicking Submit is what advances the request to the reviewer phase of the CR.
After clicking Submit, the CR will no longer show any action buttons to the Requester (unless the requester is also in a reviewer role) other than assign. Do not assign the CR to anyone - instead, reviewers will assign the request to themselves at the time of a review. The status of the CR has moved from New to Pending Review.
Performing a Review#
Note
JST is not responsible for enforcing proof of testing before migration. If your team has implemented a standard around testing, that must be enforced by the reviewer.
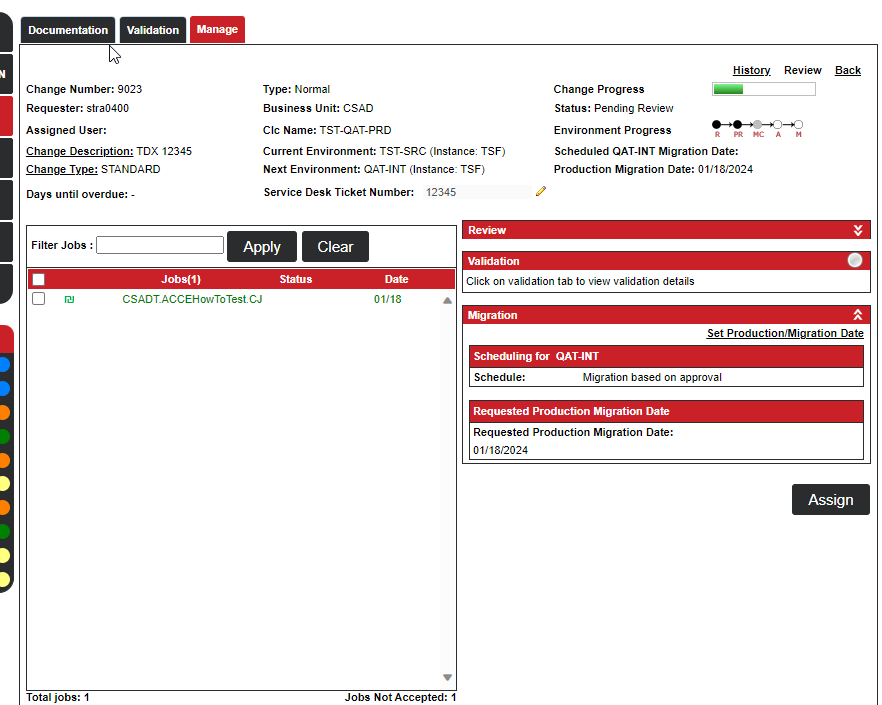
Before a CR can be migrated, all of the jobs included in the CR must be reviewed and approved by a reviewer. It will be up to the requester to inform your team's list of reviewers that you need a review - no email notifications will be sent from ACCE.
When a reviewer logs into ACCE, they can navigate to a specific CR by clicking on the Manage a Request button on the left hand navigation pane of ACCE's landing page. Or, they may see it in the My Queue section of the landing page.
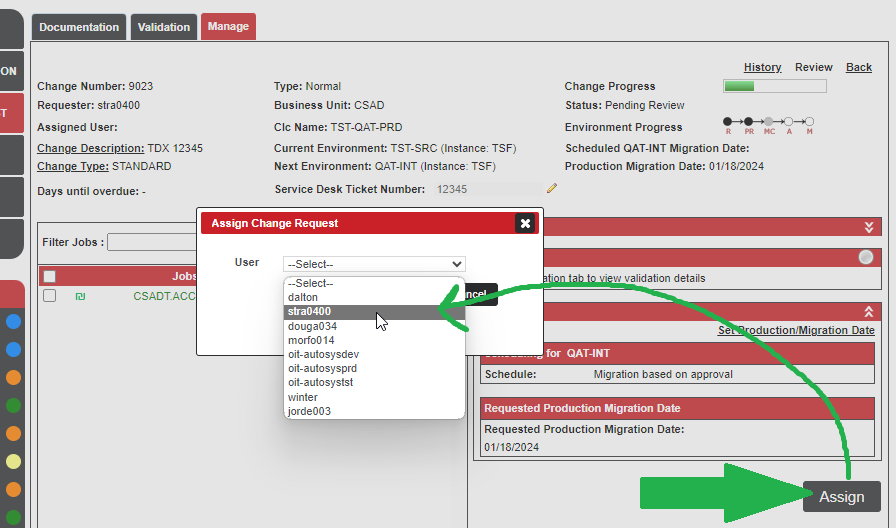
As a reviewer, to begin a review, you must first assign it to yourself by clicking Assign and choose yourself.
After assigning the CR to yourself, the "Assigned User" field now reflects your username. Also, in the bottom right corner of the page, a new set of buttons appears.
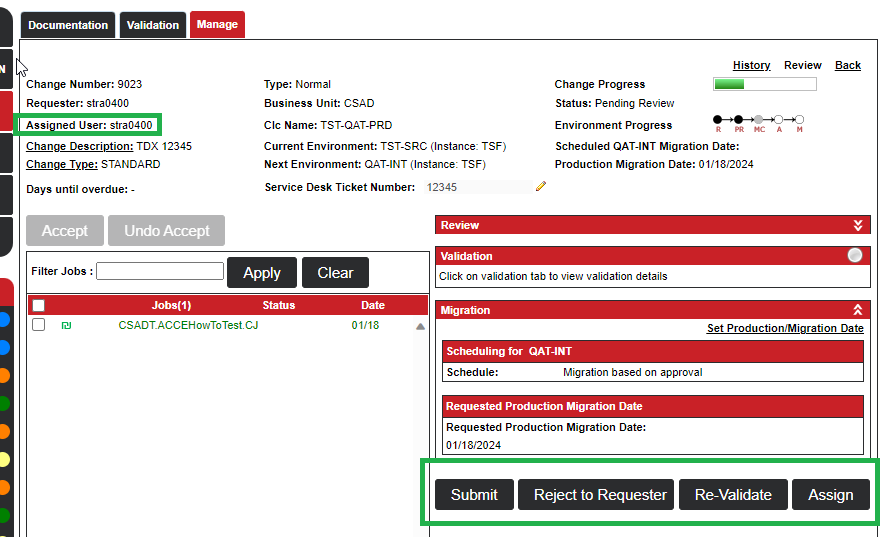
The reviewer can click "Reject to Requester" to send the request back to the Requester to make changes, if necessary.
Barring a need to reject the request, the reviewer must then review each job and approve them. If you click Submit to advance the CR beyond the review phase without approving each job, you will get an error.

To review a job, single-click the job to highlight it. After clicking, details about the job will appear to the right under the "Review" banner. Below shows one job's Review details after expanding the review banner.
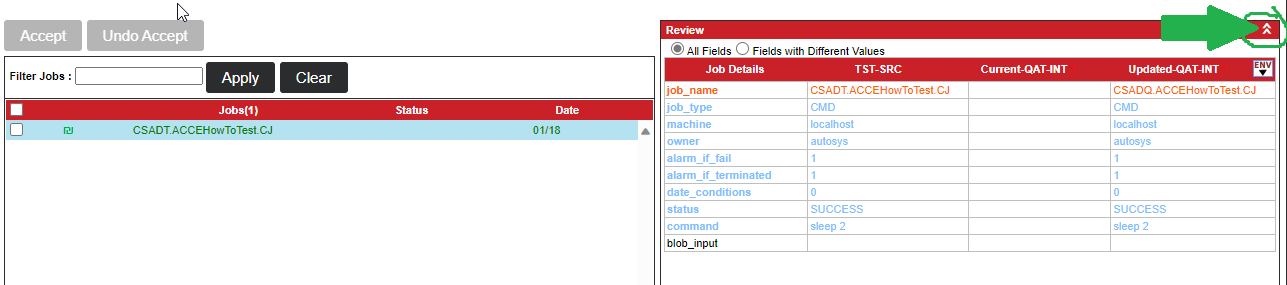
The review details will show you the job's field values:
- in TST (TST SRC column)
- current job's values in QAT (Current-QAT-INT column). This will be blank if the job is brand new to QAT.
- the to-be job's values after migration to QAT (Updated-QAT-INT column).
If the values look good, then you check the box to the left of the job name and then above click the Accept button. Do this for every job in the request.
Be mindful and thoughtful about job detail attributes that are different between instances. If the review pane shows the field in orange text, that means there are rules in ACCE to reshape the value as it migrates. Orange attributes, then, are likely safe to allow to migrate forward. Attributes that are in blue text show attributes that will change as it migrates, but are not altered by ACCE migration rules. Pay particular attention to these changes and verify you are happy to have the values overwritten in the next instance. If not, work to alter values before migration.
Note
The field max_run_alarm will be reset to blank as it migrates. A JST-administered script will run each night and re-calculate the proper value and re-populate it.
If you see that some value for a job is not being altered properly for migration, please contact JST for assistance by opening a TDX ticket (or updating your existing TDX ticket for this work) using email address jst-help@umn.edu.
After the reviewer has approved all jobs, then click the Submit button. The request will move into a status of "Pending Migration." At this point, the reviewer or requester should update the TDX ticket (or open a new) asking JST to migrate the CR - please provide the ACCE CR # when requesting a migration.
Migration#
After being notified via TDX, JST will migrate the CR to QAT. JST will update the TDX to let you know when this has been completed.
QAT to PRD Review & Migration#
After migration, the CR will be put back into a status of "Pending Review." Again, a reviewer for the business unit must perform the same review process in order to move the CR into a status where you can request another migration, this time from QAT to PRD. Follow the same process as described above to review & request migration.